Roasting on the Quest M3s: An Update
A year down the road, and we are still roasting on the Quest M3s roaster, now set up here at The Crown in our roasting lab. We’ve had classes for our baristas and the public to learn to roast on this machine, and we’ve released more than 50 Crown Jewels replete with analysis since we introduced this roaster. It’s been a wild year, and so much has changed!
First and foremost, I must state that I haven’t had a single problem with this machine. Let’s be honest: no problem that wasn’t a result of operator error!
One of the most frequently used parts of the roaster is the timer knob. After some overzealous trimming on this part by someone who shall remain nameless, we needed to order a replacement. It’s a very specific part, and your best bet is to contact Molly Yen over at the manufacturer if this happens to you; their service is swift and impeccable.
Other than this, the Quest M3s is a solid machine and should serve you (and me) well for many years to come.
Maintenance
Following best practices for maintenance and cleaning is paramount for any roaster. Cleaning your machine frequently will help reduce wear and tear, and will allow your machine to keep working in tip-top shape.

I took apart this roaster roughly 4 months ago and cleaned it thoroughly. Any parts that weren’t able to be soaked with Urnex got scrubbed with denatured alcohol. The most difficult part to disassemble turned out to be the fan assembly. Word on the street is that you can take out the fan blade assembly and soak it, dry it, replace put it back into place. I wasn’t able to remove it and wasn’t about to force the issue, so I cleaned it with cotton swabs and denatured alcohol.

The top tube and green chute are perhaps the first things to come off as you disassemble this roaster, and just as well – they’re probably the most susceptible to accumulating chaff and oils! Just look at this gnarly green chute:
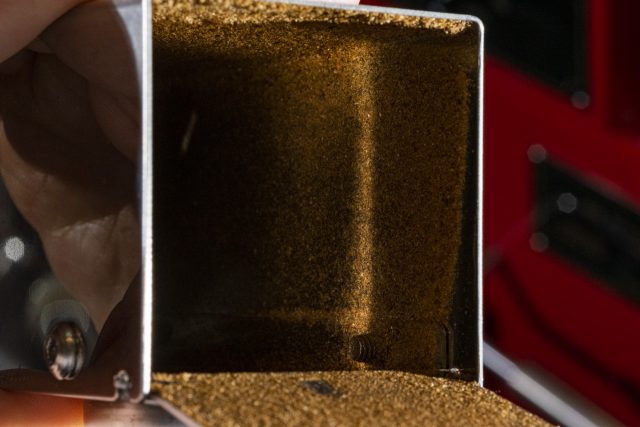
Remember to take before and after pictures so that you have a good reference for where all the parts of this roaster belong. You’ll thank yourself later.
A final note: It’s also important to keep the bearings on this machine oiled. You may hear some squeaking after normal use, and this is a good sign that your machine requires its bearings to be greased. Better yet, create a regular maintenance schedule for yourself and catch this problem before it ever occurs. I have oiled the bearings twice since this machine was purchased, precluding any squeaking the second time. It’s just about time for the third application as I write this article.
Modifications
One of the most entertaining aspects of this roaster is the modification, and all the different mods that people have listed on home roasting forums. These range from folks painting the roasting drum black for better thermal properties, to adding PID controllers and automating their entire roast. This first year, I wanted to start simple, with a low barrier of entry to the average home roaster. Every aspect of my current setup was made with particular attention to sturdiness, functionality, and affordability. Suffice it to say that if you can afford to get this mighty little home roaster, you’ll likely be able to afford the modified setup I’m using.
As mentioned in my first post, my peripherals are fairly minimal. A $2 USB light, and a 200 CFM computer fan for cooling that cost a whopping $12. Pretty simple, so far.
Where it gets fun is the thermocouple setup! For this setup, I purchased a Yocto-Thermocouple with case, and some very simple K-type probes. You can find my bean temperature and environmental temperature probes online. These aren’t the most sensitive probes, but they do give you the ability to perform data logging. My goal here wasn’t to be the most accurate or bleeding edge. Again, I want this first iteration to be very approachable. If you want slightly more finesse, I recommend checking out the thermocouple probe collection over at Mill City Roasters and trying some of the builds over at home-barista.com.
During my first iteration, I wanted to make this setup as portable and minimal as possible, and I felt that using an out-of-the-box Raspberry Pi 3 model B running Raspbian, a Debian Linux OS optimized for the Raspberry Pi. I’ll just say I’m not familiar with Linux operating systems, and that (for me, at least) getting the Yocto-Thermocouple to communicate with the Artisan roast logging software was rather difficult. I was able to get the native Yoctopuce Yocto-Graph to work perfectly, but most folks I know enjoy having Artisan roast curves to look at. After a few hours and many attempts, I just wanted to get roasting.
In the end, I plugged the Yocto-Thermocouple directly into a laptop running the latest Windows OS and the latest build of Artisan… and it just worked! I was even able to run it on an Intel Compute Stick and an older, X86 compatible build of Artisan. I didn’t have to change any settings, learn how to use Linux, or try to SSH into my Raspberry Pi from upstairs because my automation failed and I smelled something burning. Keeping it simple, remember? Throughout my travails, Marko Luther and Sebastien Rinsoz of Yoctopuce were incredibly helpful in trying to diagnose my problems; many thanks to them!
In a matter of minutes, I was seeing roast curves being logged, exporting spreadsheets of roast data to our visualization software, and generally having a good time.
If you’re interested in DIY builds, the Quest is a great roaster to modify, especially with all the literature available.
Roasting Practices
As I have been familiarizing myself with this machine, I’ve noted how various coffees react throughout the roast process. With a good deal of different coffees at my disposal, some patterns have emerged. However, after going through a few different methodologies, I believe I have found my preferred method for roasting on this machine.
I begin with maximum airflow and 9.5A power as I charge the drum with coffee. The maximum heat application on our machine is around 11A at 120V, but I tend not to push this hard as the machine tends to overheat between roasts. Generally, I charge at around 385F – 395F at the Bean Temperature thermocouple; any lower and I’ve found that roasts take much too long to reach first crack. I like to keep my environmental temperature below 300F, but your preferred temperature is bound to be different depending on the placement of your thermocouple.
At turning point, I kill the fan and open the back of the roaster to cut airflow entirely. Depending on how well I suspect the coffee to take on heat, I reintroduce airflow when the bean temperature reads from 230F – 260F. From this point, I generally ramp up airflow until I hit full fan speed around 310F. Keep in mind that when you first engage the fan, you may see a spike in the rate of rise due to moisture being whisked away from the drum.
I then begin ramping down heat application to 7.5A, or if there is enough momentum, cut heat application entirely around 365F – 395F. This last drop in heat application really depends on the coffee: some natural coffees really don’t need much of a push, and other types of coffee need steady heat application for much longer. If you want some deeper reading on this, I would suggest Chris’ article on Density, specifically the ‘Qualitative Significance’ section.
All in all, there are certainly best practices, but with roasting, you’re always able to choose your own adventure. Keep roasting on the quest, keep writing in, and we’ll keep roasting up new Crown Jewels!
Need Help?
At The Crown, we offer consultation services from introductions to roasting and cupping, to advanced skill sets like QC program development, and more. Take a look at our standard packages or email us at thecrown@royalcoffee.com to customize your training to your needs.
Latest Articles by Evan Gilman

Indonesian Coffee Cultivars and Varieties
By Evan Gilman With contributions from Surip Mawardi, Tovan Marhennatta, Chris Kornman Indonesian Coffee Cultivars and Varieties Coffee’s cultivated history on the world’s largest archipelagic state, and fourth-most-populous country, dates...
Qonclave, or: Nobody Expects the SCA Acquisition
By Evan Gilman, Creative Director, Indonesia Green Buying Team, CQI Arabica Quality Evaluation Instructor Article Summary: Royal Coffee’s Evan Gilman reflects on the abrupt handover of the Coffee Quality Institute’s...

The Crown Gallery Artist Interviews: Jasmine Singh Rosado
The Crown seeks to give exposure to local and international artists through The Crown Gallery, and hosts new artists every four months. The Crown Gallery is currently accepting submissions for...