Mise en Place
Setting Up for Success as a Home Roaster
By Evan Gilman and Nate Lumpkin
Roasting in the comfort of one’s own home is, in our minds, one of the most pleasurable experiences in the coffee world. Having your creature comforts nearby while you roast makes the whole affair much more manageable; maybe you even have a support animal getting you through a tricky roast.
While having more gadgets and appliances is an anathema to the tidying-up of the home that’s so popular right now, I try to take a cue from what I remember of my grandfather’s garage; tools arranged just so, and a workbench so clean you’d swear he wasn’t in there every evening fixing his old Walkman or oiling the lawnmower. Maybe this sort of compulsion is fitting with another trend: the explosion of media surrounding fine dining, with a special focus on kitchens. Bear with me here, I’m not talking about eating lawnmowers just yet.
I’m talking about Mise en Place.
Originally meant to refer to arranging ingredients before cooking, it’s literally translated as ‘putting in place’ or ‘everything in its place.’ Both cooking and roasting coffee are very time dependent processes, and even a moment of hesitation can lead to burnt garlic or a roaster fire, so it’s very important to have all your materials placed for your success. Another less-commonly used but related term is ‘knolling,’ but French terms have a certain je ne sais quoi, wouldn’t you say? Also, we’re talking about food here, not designer chairs.
What exactly are we arranging, however? Many times, our roaster can only be in one place: someplace with power, gas, and ventilation. So we must arrange our other roasting-related items around it in such a way as to complement our experience. Here, I’d like to take a look at some of the most useful items a home roaster can have to aid them along the way in their journey to a delicious cup of coffee.
First, let’s start with the simpler items that are going to make your life easier, then we’ll move on to the more technical items.
Documentation:
It’s this simple: always keep a pen and pad handy, or a digital device if that’s your jam. The more you document about your roasting practice, the more consistent you can get. The more consistent you are, the more you can hone your craft. If you’re feeling less commitment, I might suggest a pencil. Write everything down!
Another thing to have handy is scrap paper for labeling your coffees as they come out of the roaster. You can never have too many labels at the ready. Here at The Crown, scrap paper is a hilariously hot commodity. We try to keep plenty next to every roaster in the building.
Weighing:
There are so many options for scales; the important thing to remember is to find a one that can handle your largest batch size. Some kitchen scales are only able to weigh up to 2000g/2kg, so if your batch is bigger than that, you’ll need to find a more suitable scale for medium or large quantities.
You might also consider something that you can use for both roasting and brewing like the Acaia series of scales, which come with all sorts of connectivity options. Or, you can use an antique candy scale like we do at the Royal Coffee, Inc. offices if you’re feeling spicy!
We keep a scale next to our roaster at all times, not only for weighing our input, but also the roasted coffee. In this way, we can determine our roast loss percentage. It’s never fun to have to look for a scale at the last moment.

Storage:
For immediate storage, consider getting some roast trays for smaller roasts. If you want to keep your coffee for longer, valve bags are always good, and you can couple them with a heat sealer. I prefer to generate less waste, and have a couple vacuum containers, as well as a whole flotilla of mason jars. If you’re the technical type, aluminum-lined vacuum sealed bags have been shown to be the very best way to store coffee.
Our roast trays are stored right next to our roaster, and one even holds the aforementioned scrap paper for labeling roasts!
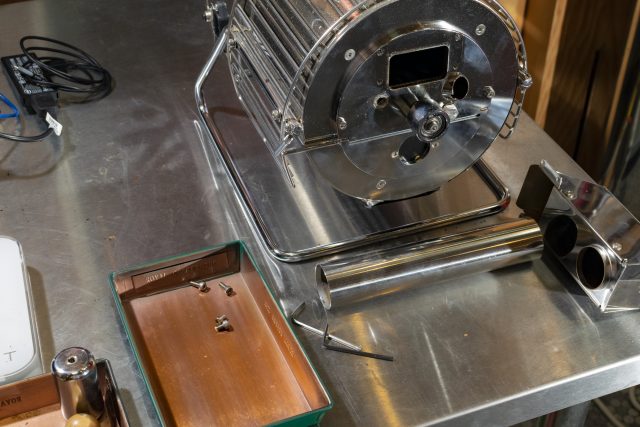
Trays are also handy for holding parts while you disassemble your roaster for cleaning.
Brushes:
Keeping your space clean is a must, and there’s going to be chaff. Get a nice brush to help keep your space clean. Some sturdier options like this counter brush or this grinder brush can be had from coffee-specific sites, but if you’re feeling artsy, I always enjoyed using drafting brushes and small acrylic paintbrushes for those hard to reach spaces. Get creative! These also live right next to the roaster, in a sample tray.
Coffee Handling:
One of my very favorite tools that gets brushed over (heh) is the ‘cradle’ or bean scoop. Light enough to use on a scale, and a perfect opening for pouring into your roaster’s green chute. Of course, if you’re dealing with larger quantities, a regular old scoop will be very useful. At home, I don’t have either – I use the funnel that came with my AeroPress because it fits perfectly into the Quest M3s’s green chute. Adapt, improvise, overcome.

Vacuums:
The introduction of a vacuum was life-changing for me as a barista and a roaster. A tough handheld vacuum like this one will help you keep your space clean. If you’re making bigger messes, consider getting an actual wet/dry shop vac that you don’t need to empty every roast. Our vacuums are usually kept nearby, in most cases beneath our sample roasters.
Compressed Air:
You like airflow, you say? You’re a big fan? Try compressed air. One of these can help you get to the hard-to-reach areas that even your dust buster has a hard time with. Chaff fires are no fun at all – avoid them by keeping even the very back of your roaster clean. Even dust can start a chaff fire; only you can prevent roaster fires!
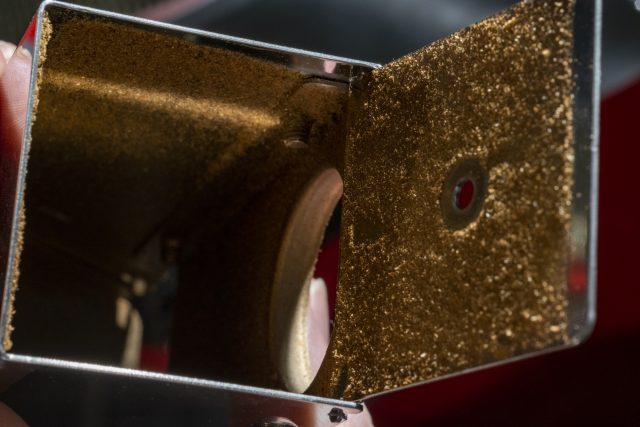
Never let your roaster get this dirty!
Denatured Alcohol:
This is perhaps the best solution for your deep cleaning needs. There’s nothing unnatural about wanting to keep your roaster free of oils and condensates from repeated roasts. Use denatured alcohol in a very well ventilated environment after your roaster has cooled completely, and watch the grime dissolve with even the slightest application. Beware, it’s flammable – keep away from the roaster while the roaster is in use, and always make sure the cap is tightly affixed.
Thermocouples:
Thermocouples and probes offer you the ability to document the temperature of your roaster in various places. Bean temperature, environmental temperature, and exhaust temperature are the most commonly documented, and there’s a tome of literature behind the rationale for documenting each one, but we’re focusing on the equipment here, starting with the simplest options. If you really want to get into it, check out Candice’s article on thermodynamics here.
If you want to document by hand and aren’t too concerned about being super exact every roast, consider getting a handheld thermocouple or multimeter. There are a ton of affordable options here, from 2-channel digital thermometers, to 4-channel beasts that can give you all of the above readings, plus another just for fun. Some of these (the pricier ones of course) will have USB output, so you can integrate them with your computer if you get tired of trying to write down 4 readings every 15 seconds.
You’ll need to get probes for your thermometer, as well. Stick to J-type or K-type only, as those are the ones rated for temperatures above 500F. Something like this simple wire probe would be alright to use for exhaust, but certainly not your bean probe. Bean probes need to be sturdier, but keep in mind that the thicker they are, the less sensitive they are to temperature changes. Mill City has some great options to choose from for your bean probe. If you want a read of the room, you can also use a simple wire probe, or something like this adhesive probe if you want to keep it affixed to a certain area for consistency’s sake.
As far as documenting to your chosen software, there are a bunch more interfaces to choose from. I use the Yocto-Thermocouple for documenting two temperatures using Artisan software. Some people swear by Phidgets. Neither of these options have readouts, and require you to use software to document your roast, whether it’s Artisan, Cropster, or their native software.
Moisture Meters:
We’re really getting into the weeds here, but, while not essential, a moisture meter can tell you a lot about how your coffee will roast. Take a look at this evergreen article to learn more. We provide moisture measurements on all our Crown Jewel offerings, but you can take it for granted that moisture levels will change over time depending on the environment. These can get rather expensive, but if you’re planning to roast for a long time, having one handy will be worth it for your consistency as a roaster. There are handheld models, and more sophisticated benchtop models if you don’t have a budget constraint.
All of these items can make your roaster life easier, and having them set up in your space in a way that makes it easy for you to do your work will make the experience that much more enjoyable. Take a look at your space, find a place for each item that makes the most sense for you, and truly consider your workflow.
Latest Articles by Evan Gilman

Indonesian Coffee Cultivars and Varieties
By Evan Gilman With contributions from Surip Mawardi, Tovan Marhennatta, Chris Kornman Indonesian Coffee Cultivars and Varieties Coffee’s cultivated history on the world’s largest archipelagic state, and fourth-most-populous country, dates...

Qonclave, or: Nobody Expects the SCA Acquisition
By Evan Gilman, Creative Director, Indonesia Green Buying Team, CQI Arabica Quality Evaluation Instructor Article Summary: Royal Coffee’s Evan Gilman reflects on the abrupt handover of the Coffee Quality Institute’s...

The Crown Gallery Artist Interviews: Jasmine Singh Rosado
The Crown seeks to give exposure to local and international artists through The Crown Gallery, and hosts new artists every four months. The Crown Gallery is currently accepting submissions for...
Plenty of good ideas here. Not having access to any such advice when I started out, I worked out a similar list of essentials for my roasting space. After hobbling along for a few years, and turning out some rather drinkable stuf,f I attended a Roasters Guild Retreat. The ONE thING I had been missing out on came crashing down on my head… RECORD YOUR ROASTS. No funds to invest in any of the
tech” solutions, and my roaster is not set up for “connected” operation. My neantderthal relatioinship (lack of relationship?) with computerised systems also drove me toward the simple. But WHAT?
After pondering for too long I stopped by an office supply place and picked up a packet of 8 1/2 by 11 inch graph paper, quarter inch squares. After a couple false starts, I settled on temp on the left margin vertical axis, marking ten degrees F every other line. Tie on the lower horizontal axis, each two lines being another thirty seconds. Identifyingi information in upper right corner, manometer setting along the bottom, only marked when changes are made, and airflow fan settings wander through the middle, keyed to the time progression, again, only marked when changed.
Where I live is quite different than your BayArea, I eventually began to realise that relative humidity was a signficant factor, and barometric pressure, though far less signficant. So I record those, along with ambient temp, along with the coffee identifiacitoin information and date. I picked up one of those cheap three function analog wall decoration “eather statioin” things at a thrift store, about six bucks. Tem was way off,but I eventually figured out how to calibrate this, and so did. I have found that high humidity, especiallly when it comes long with low ambient temps, IS a signficant factor, and find that heat applicatioin settings (manometer readings) are significantly different depending on this factor.
My roaster (a US Roaster Corp one pound drum unit) already brings two temp sensors, a bean path probe and exhaust temp probe. So that was easy. As to handy useful cheap containers, I buy a lot of one quart yogurt containers from the store… they cost about two dolars fifty and come with a free quart of delicious yogurt. Clean them and they are perfect. They hold over a pound of green, save and reuse the snap down ilds, and the container is now closed against any hazerds. Slip of paper with coffee name on it, tuck it over the rin when you put the iid on…. For a timer I got a cheap three dollar digital unit from Ikea, it can count up or down. I hit the start button when I begin to charge the chamber, large numbers are easy to see for quick reading when keeping the timeline on the graph sheet. Every thirty seconds I mark progress. This system is so accurate )once I got into the habit/flow of using it) I have been able to esactlyh match five batches of the same coffee each roast perfectly matching the others. (I was roasting for a rather large wedding of two VERY sophisticated coffee geeks) and variation throughout the event was NOT an option.
For anyone reading this wo does not have access to the bux for all the fun toys, there ARE plenty of low tech solutionis. Not as easy to use, or fancy, but the important thing in this game is consistently turning out the very best coffees possible from the stocks you have. Accuracy and consistency are key, sophisticated expensive gadgets may or may not deliver those results.